How does Eldrazi Ramp matchup against TES?
[[Thought-Knot Seer|]]
[[Chalice of the Void|]]
[[Ugin, the Ineffable|]]
Deck List
(adsbygoogle = window.adsbygoogle || []).push({});
Main Deck
- 4 [[Burning Wish]]
- 4 [[Wishclaw Talisman]]
- 4 [[Brainstorm]]
- 4 [[Ponder]]
- 4 [[Veil of Summer]]
- 3 [[Thoughtseize]]
- 1 [[Ad Nauseam]]
- 1 [[Echo of Eons]]
- 4 [[Rite of Flame]]
- 4 [[Dark Ritual]]
- 4 [[Lion's Eye Diamond]]
- 4 [[Lotus Petal]]
- 3 [[Chrome Mox]]
- 3 [[Mox Opal]]
- 4 [[Polluted Delta]]
- 4 [[Bloodstained Mire]]
- 1 [[Badlands]]
- 1 [[Underground Sea]]
- 1 [[Volcanic Island]]
- 1 [[Bayou]]
- 1 [[Swamp]]
Sideboard
- 2 [[Abrupt Decay]]
- 1 [[Thoughtseize]]
- 2 [[Chain of Vapor]]
- 1 [[Defense Grid]]
- 1 [[Infernal Tutor]]
- 1 [[Grapeshot]]
- 4 [[Empty the Warrens]]
- 1 [[Tendrils of Agony]]
- 1 [[Echo of Eons]]
- 1 [[Pulverize]]
Ways to Win This Matchup
[[Echo of Eons|]]
[[Lion's Eye Diamond|]]
[[Burning Wish|]]
Killing Them and Our Game Plan The key turns of this matchup are the first three turns. What happens during these turns will often determine the outcome. This isn't a game about grinding and trying to outmaneuver the opponent. It's a straight-up race against their lock pieces. During the post-board games, there can be a little more play to it when we add bounce spells and removal spells. Another crucial decision we make is balancing speed using [[Empty the Warrens]] or potentially waiting a turn to go for something like [[Ad Nauseam]] or [[Echo of Eons]]. This is a tough balancing act because the punishment could be locking us out of the game if we wait another turn. As previously mentioned under what cards the opponent could play against us, they certainly have a few answers to [[Empty the Warrens]], so it's not always a guaranteed win. Making these type of decisions often come from practice and just putting in the reps to know when we should go for each combo and how many goblins we need. For example, making eight goblins is a lot different than 10-plus. The difference between a two-turn clock and a three-turn clock is huge. The number of goblins we can make may sway in which direction we go. If we're not winning quickly, we're going to want to be getting all of our permanents on the battlefield as quickly as possible. This will allow us to get underneath permanents like [[Chalice of the Void]] and [[Thought-Knot Seer]]. Sideboarding
-4 [[Veil of Summer]], -4 [[Ponder]], +2 [[Empty the Warrens]], +2 [[Abrupt Decay]], +2 [[Chain of Vapor]], +1 [[Infernal Tutor]], +1 [[Thoughtseize]]
While [[Veil of Summer]] can allow zero mana spells to resolve through a [[Chalice of the Void]] on zero, it's not very reliable. For this reason, we sideboard it out as the green instant has very little impact on the matchup. From here we bring in our suite of answers: [[Chain of Vapor]], [[Abrupt Decay]], and [[Thoughtseize]]. [[Chain of Vapor]] is the best bounce spell for answering [[Karn, the Great Creator]] and [[Trinisphere]] but tends to be weaker to [[Chalice of the Void]]. [[Abrupt Decay]] is the exact opposite since it can't hit [[Karn, the Great Creator]] and can always destroy [[Chalice of the Void]]. I would try to sequence [[Abrupt Decay]] to destroy any copies of [[Chalice of the Void]] and then leave [[Chain of Vapor]] for any remaining permanents. [[Empty the Warrens]] is also pretty good here because it allows the deck to combo off faster and before any hate permanents can come down.
(adsbygoogle = window.adsbygoogle || []).push({});
Game Play
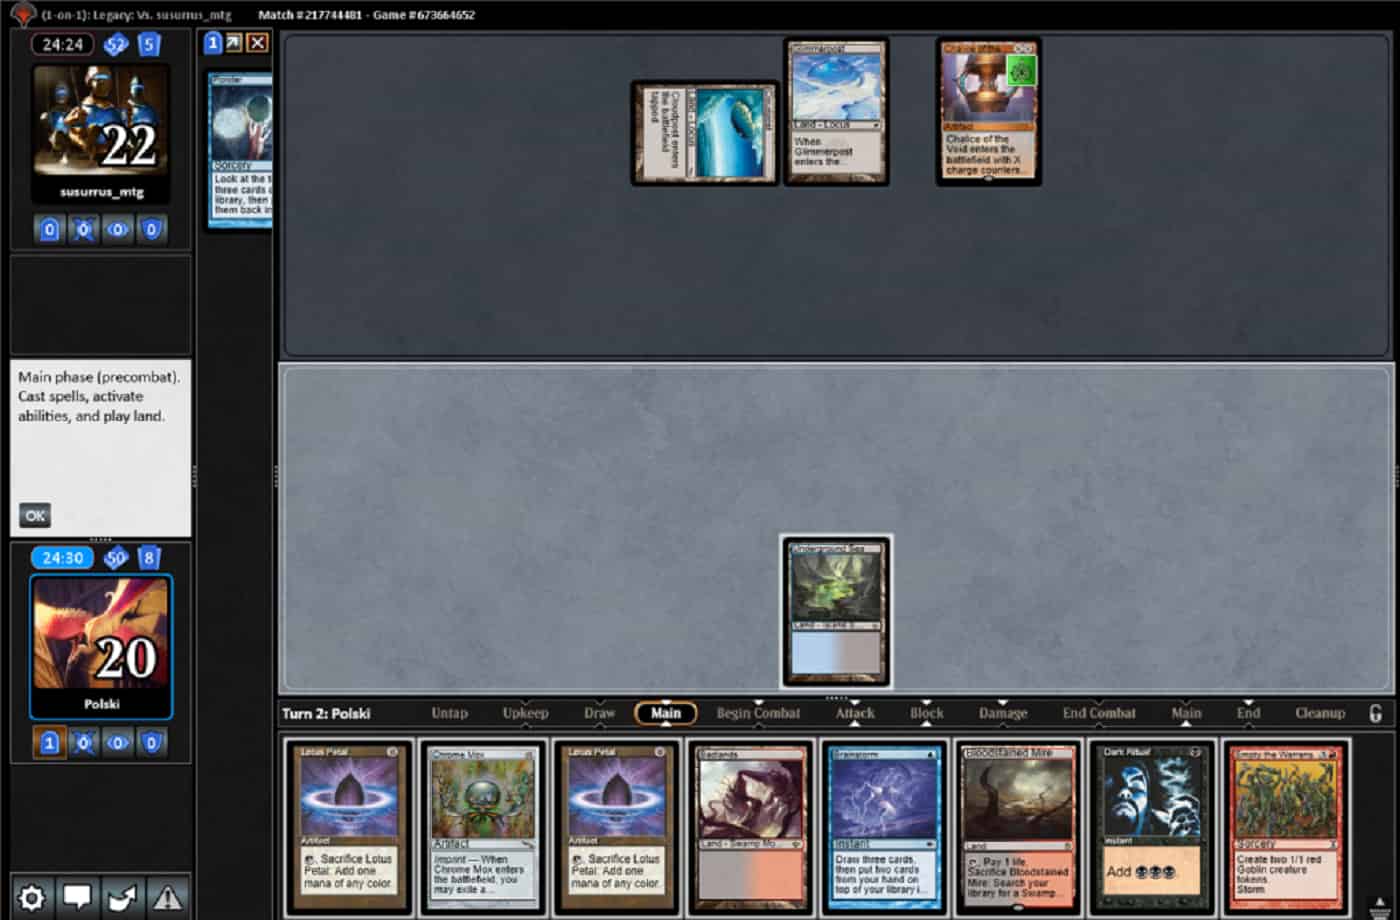
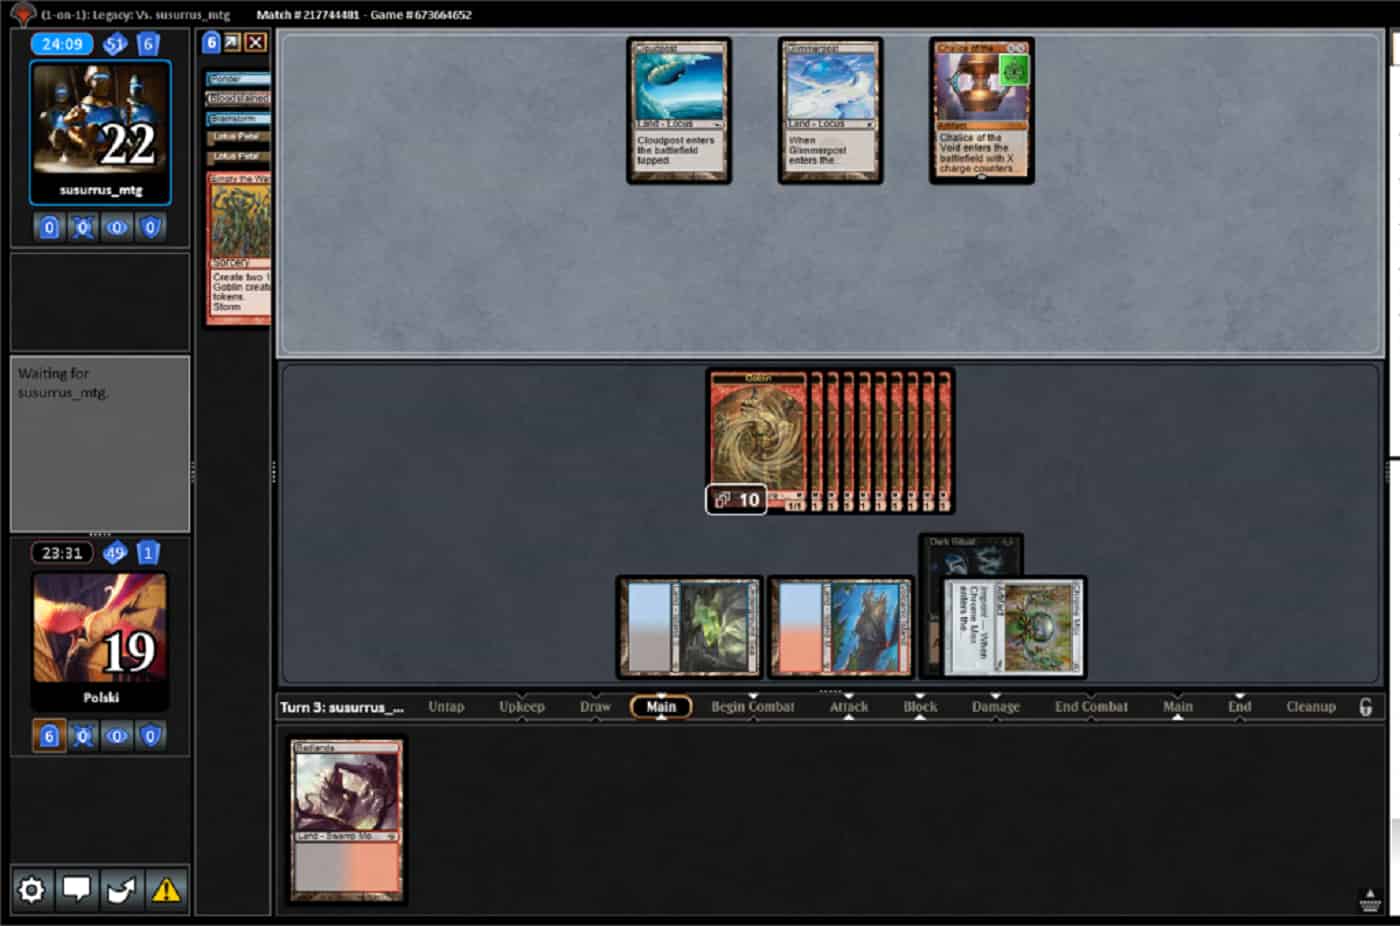
Example Game - Game Three on the Draw I lost the die roll and was on the draw. I had a relatively decent hand, but just missing a tutor or a pay off card. My opponent lead off with a tapped land, and on my first turn, I just played a land and cast [[Ponder]] hoping to set up a second turn combo. Unfortunately, on my opponent's second turn they played a [[Chalice of the Void]] for one. On my turn, I drew the [[Empty the Warrens]] that I knew was there from my previous turn. I then had the option to cast [[Empty the Warrens]] for 10 goblins, and I did just that. My opponent then responded on their turn by playing a [[Walking Ballista]] and [[Thran Dynamo]] to block and shoot down a couple of tokens after I attacked on my third turn.On their following turn, the opponent cast [[Karn, the Great Creator]] to tutor for a [[Ratchet Bomb]] to play. Having no resources left and my opponent with an active planeswalker, I conceded the gameDespite me losing this game, I think it's an important one with several lessons in it. The first is that it shows the flexibility of TES that we can still combo off through a [[Chalice of the Void]]. It proves that it's not the end all be all. The second important lesson is just because we can still combo off using [[Empty the Warrens]] early in the game doesn't mean it'll be good enough. If I was in the same situation in the future, I would still go for it and cast [[Empty the Warrens]]. There's no other path to victory here and I can't just sit and wait for another pay off card. The opponent probably has less than 6-7 cards in their deck to beat [[Empty the Warrens]], and a lot more than prevent me from comboing off. I hope you enjoyed this example game, and I wish you the best of luck in your own testing!
 My opponent then responded on their turn by playing a [[Walking Ballista]] and [[Thran Dynamo]] to block and shoot down a couple of tokens after I attacked on my third turn.
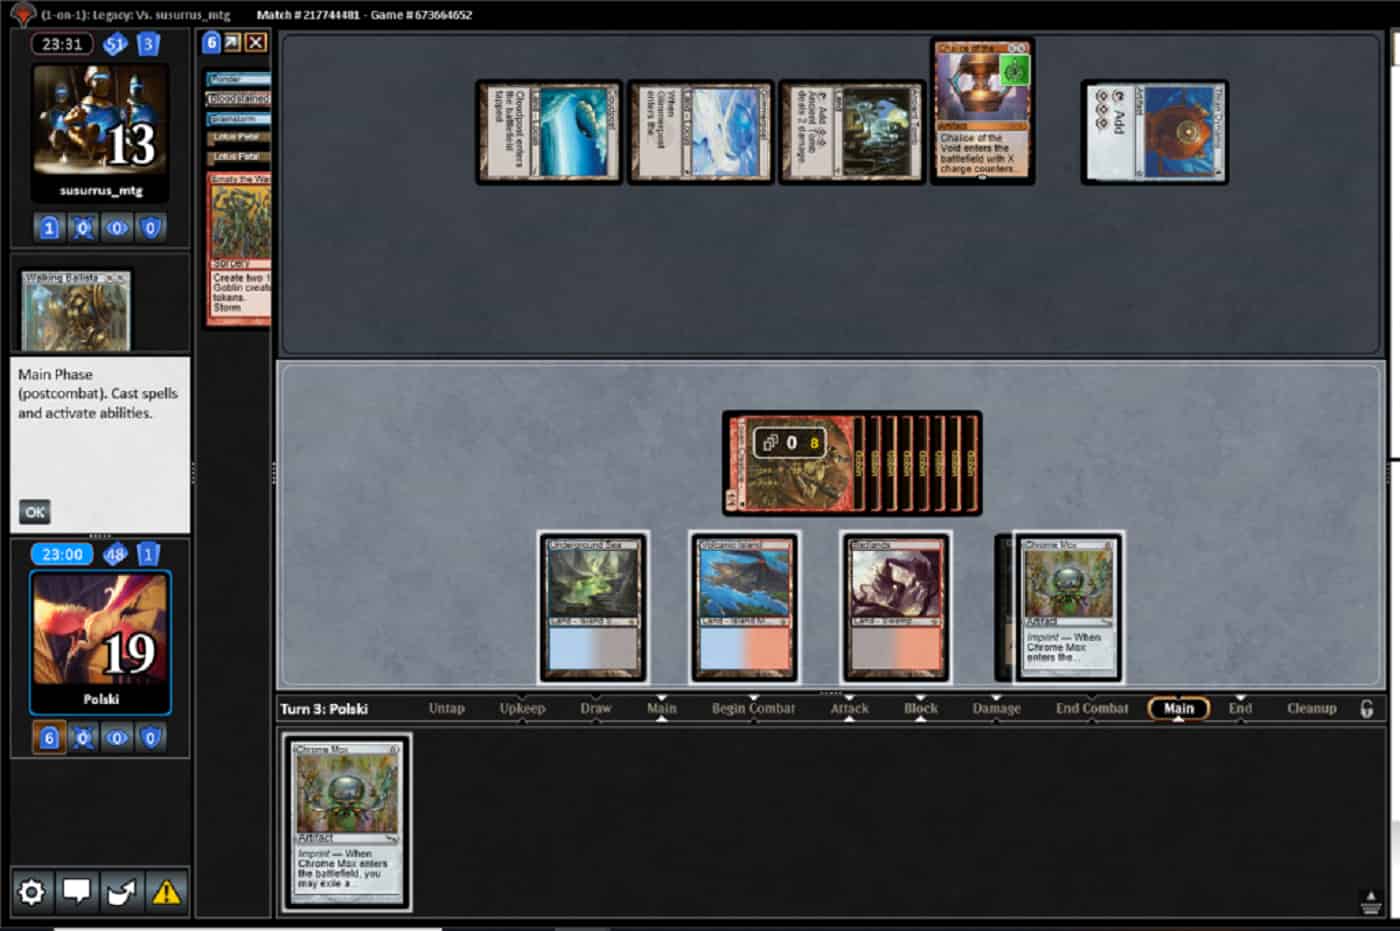 On their following turn, the opponent cast [[Karn, the Great Creator]] to tutor for a [[Ratchet Bomb]] to play. Having no resources left and my opponent with an active planeswalker, I conceded the game
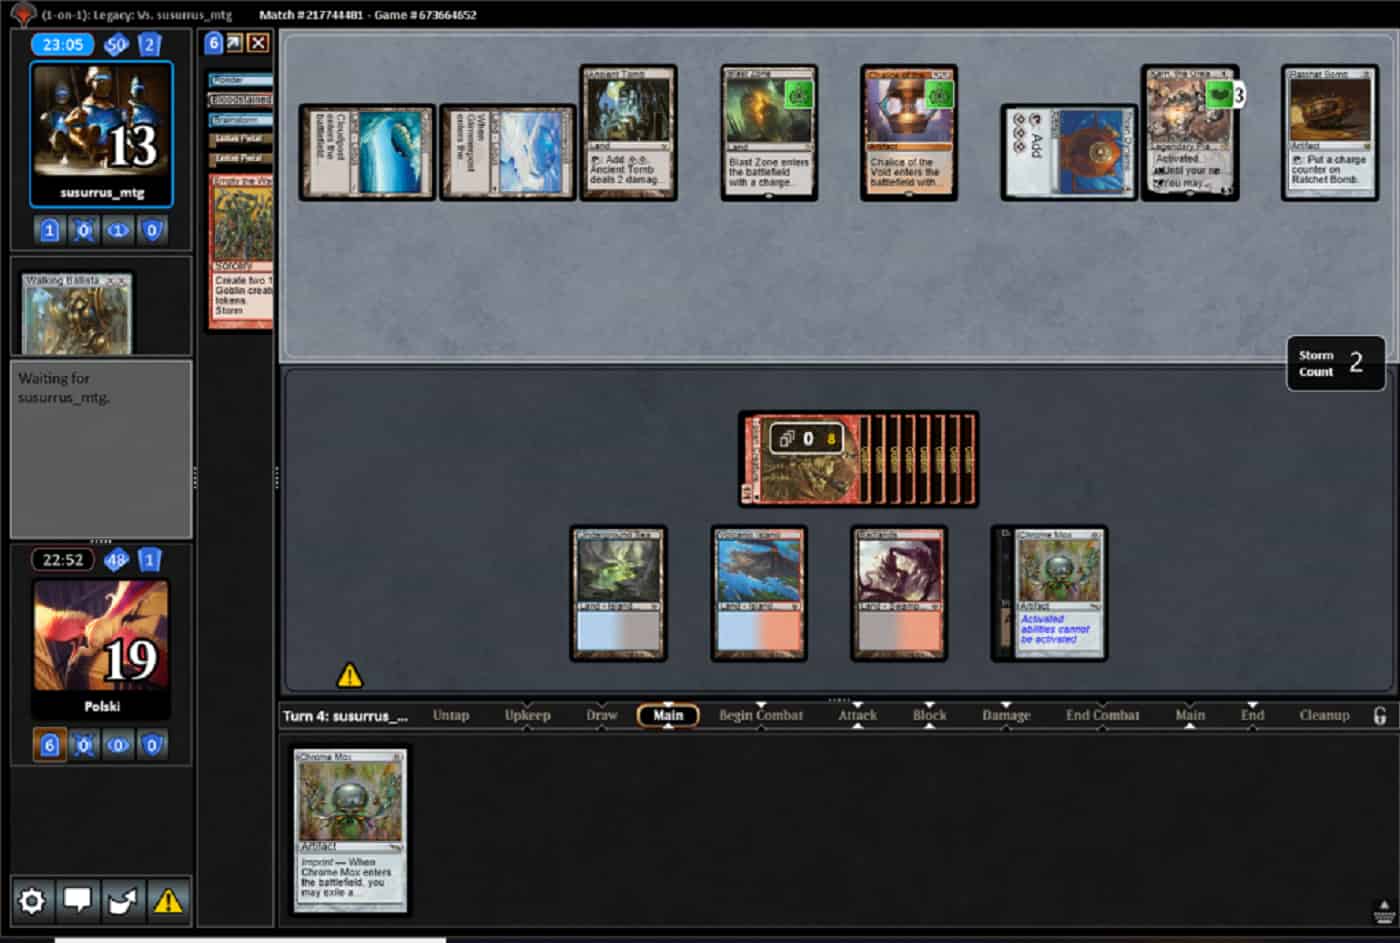 Despite me losing this game, I think it's an important one with several lessons in it. The first is that it shows the flexibility of TES that we can still combo off through a [[Chalice of the Void]]. It proves that it's not the end all be all. The second important lesson is just because we can still combo off using [[Empty the Warrens]] early in the game doesn't mean it'll be good enough. If I was in the same situation in the future, I would still go for it and cast [[Empty the Warrens]]. There's no other path to victory here and I can't just sit and wait for another pay off card. The opponent probably has less than 6-7 cards in their deck to beat [[Empty the Warrens]], and a lot more than prevent me from comboing off. I hope you enjoyed this example game, and I wish you the best of luck in your own testing!